When you shift-right-click an HTA file, the expanded context menu does not by default display Run as different user or Run as administrator. There is a workaround for this. It involves registry modification. Once the registry entries are added, you will be able to easly run HTA as different user or administrator. Read on to see how to add the Run as different user and Run as administrator options to the expanded context menu, as shown in figure 1:
Figure 1 – Run HTA as Different User or Administrator

Disclaimer
This procedure involves modifying the registry. It can cause serious problems that may require a full operating system re-install. DO NOT do this live without first testing in a lab environment. If you elect to proceed with these registry modifications, do so at your own risk. Do not forget to make a backup.
To launch the Windows registry editor, click Start, type regedit and press Enter. We are going to assume that your registry does not already contain a key named HKEY_CLASSES_ROOT\htafile. If it does, then your exact steps may differ from what is described below.
We are going to illustrate two different methods. Method 1 is bit tedious, but contains exact steps on how to manually update the registry to allow us to run HTA as different user or administrator. Method 2 simply describes how to create a .reg file to automatically merge the new registry settings. Feel free to follow either method, as they both arrive at the same result.
Method 1: Manually Update the Registry
Method 2: Create a Registry Entries (.reg) file
Method 1: Manually Update the Registry
1. Launch the Windows Registry Editor. To launch the editor, click Start | Run | type “regedit” | Hit Enter.
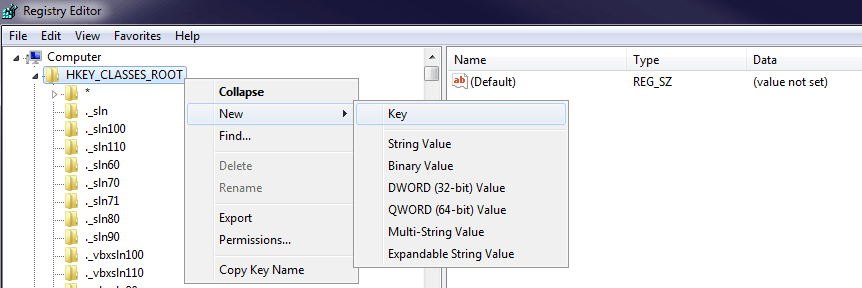
2. In the Registry Editor, create the following keys:
HKEY_CLASSES_ROOT\htafile
HKEY_CLASSES_ROOT\htafile\CLSID
HKEY_CLASSES_ROOT\htafile\DefaultIcon
HKEY_CLASSES_ROOT\htafile\Shell
HKEY_CLASSES_ROOT\htafile\Shell\Open
HKEY_CLASSES_ROOT\htafile\Shell\Open\Command
HKEY_CLASSES_ROOT\htafile\Shell\runas
HKEY_CLASSES_ROOT\htafile\Shell\runas\command
HKEY_CLASSES_ROOT\htafile\Shell\runasuser
HKEY_CLASSES_ROOT\htafile\Shell\runasuser\command
Note: to create a new key in the registry, right-click the parent key and then select New | Key. For example, to create a new key called htafile under HKEY_CLASSES_ROOT, you would right-click HKEY_CLASSES_ROOT, select New, click Key, and then type htafile:
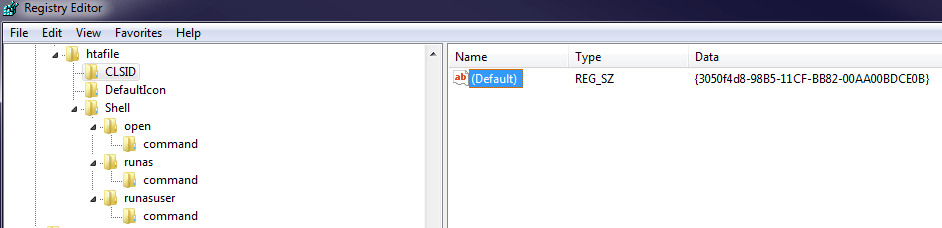
3. Set the String Value of HKEY_CLASSES_ROOT\htafile\CLSID\(Default) to {3050f4d8-98B5-11CF-BB82-00AA00BDCE0B}:
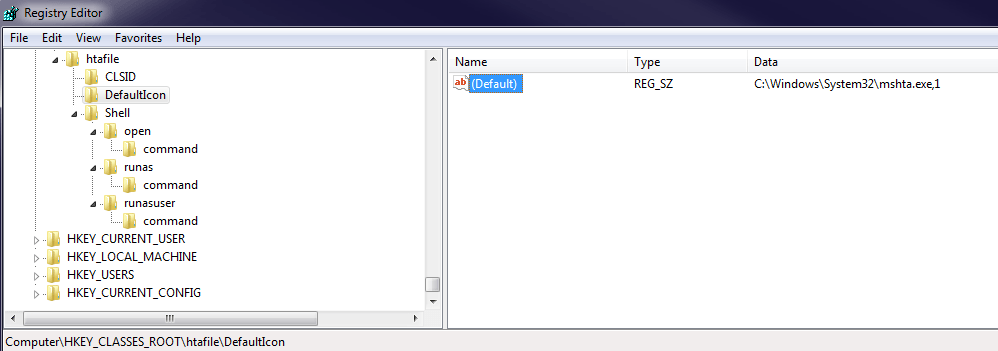
4. Set the String Value of HKEY_CLASSES_ROOT\htafile\DefaultIcon\(Default) to C:\Windows\System32\mshta.exe,1:
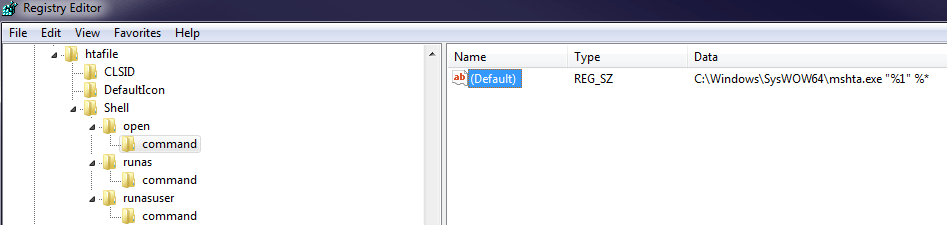
5. Set the String Value of HKEY_CLASSES_ROOT\htafile\Shell\Open\Command\(Default) to C:\Windows\SysWOW64\mshta.exe “%1” %*:
6. Add new String Value HKEY_CLASSES_ROOT\htafile\Shell\runas\HasLUAShield with a blank value:
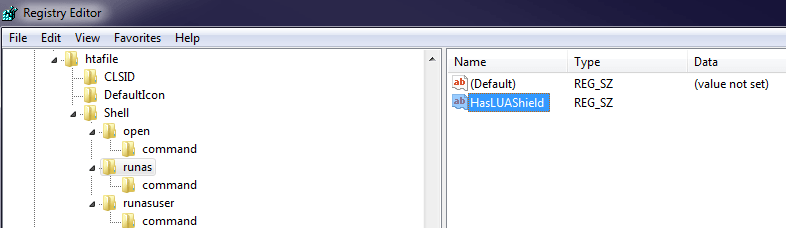
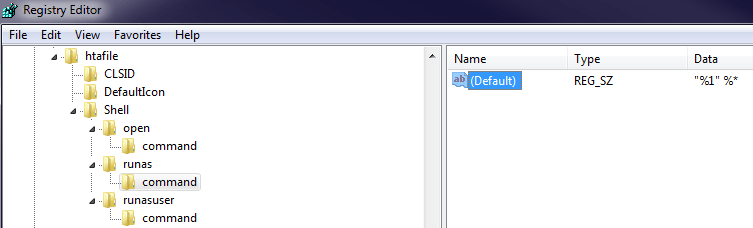
7. Set the String Value HKEY_CLASSES_ROOT\htafile\Shell\runas\command\(Default) to “%1” %*:
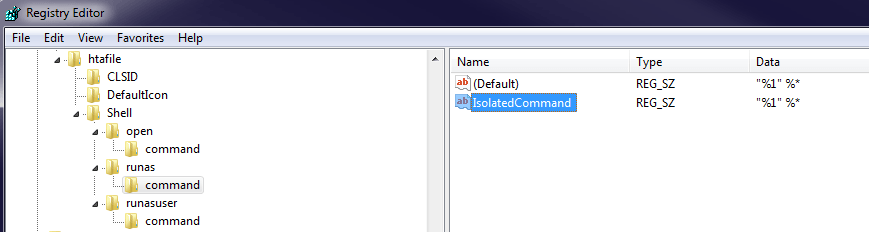
8. Add new String Value HKEY_CLASSES_ROOT\htafile\Shell\runas\command\IsolatedCommand with a value of “%1” %*:
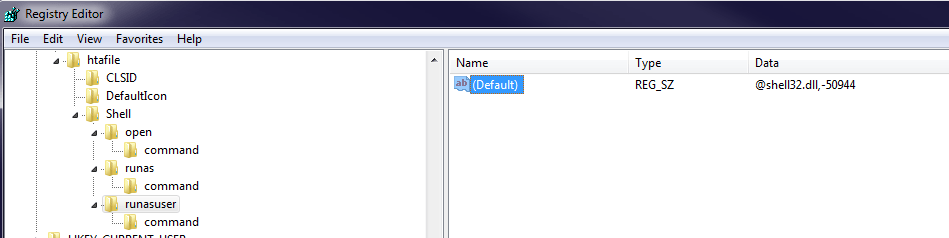
9. Set the String Value HKEY_CLASSES_ROOT\htafile\Shell\runasuser\(Default) to @shell32.dll,-50944:
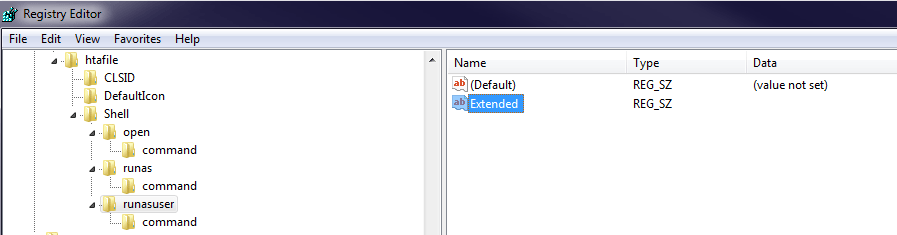
10. Add new String Value HKEY_CLASSES_ROOT\htafile\Shell\runasuser\Extended with a blank value:
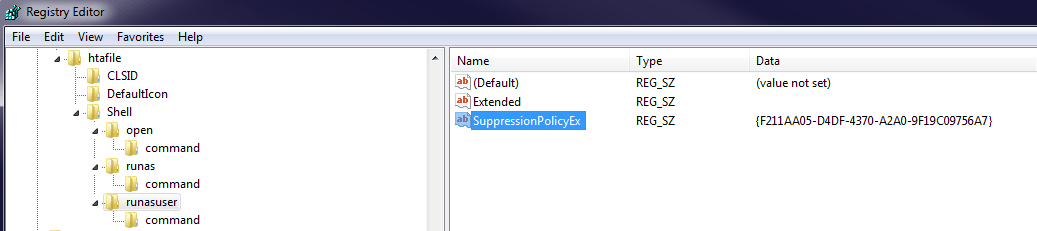
11. Add new String Value HKEY_CLASSES_ROOT\htafile\Shell\runasuser\SuppressionPolicyEx with a value of {F211AA05-D4DF-4370-A2A0-9F19C09756A7}:
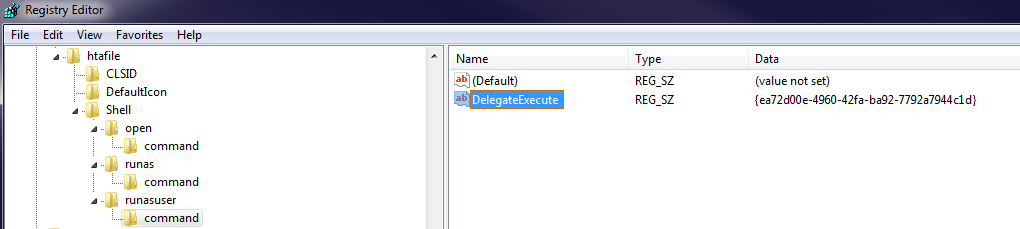
12. Add new String Value HKEY_CLASSES_ROOT\htafile\Shell\runasuser\command\DelegateExecute with a value of {ea72d00e-4960-42fa-ba92-7792a7944c1d}:
13. To test, right-click an HTA file while holding down the SHIFT key. This will show the expanded context menu. The menu should now contain the Run as different user and Run as administrator options, as shown at the beginning of this article. No reboot required.
Method 2: Create a Registry Entries (.reg) file
1. Back up the registry. See How to back up and restore the registry in Windows.
2. Create a new file anywhere on your hard drive. Give it a “.reg” extension. For example, C:\HTA_Runas.reg
3. Select and copy the following content and paste it into the newly created .reg file. Or, alternatively, you can download the .reg file by right-clicking this link and selecting Save Link As or Save Target As. Then skip to step 5.
Windows Registry Editor Version 5.00
[HKEY_CLASSES_ROOT\htafile]
  "EditFlags"=dword:00100000
  @="HTML Application"
  "FriendlyTypeName"="@C:\\Windows\\System32\\mshta.exe,-6412"
[HKEY_CLASSES_ROOT\htafile\CLSID]
  @="{3050f4d8-98B5-11CF-BB82-00AA00BDCE0B}"
[HKEY_CLASSES_ROOT\htafile\DefaultIcon]
  @="C:\\Windows\\System32\\mshta.exe,1"
[HKEY_CLASSES_ROOT\htafile\Shell]
[HKEY_CLASSES_ROOT\htafile\Shell\Open]
[HKEY_CLASSES_ROOT\htafile\Shell\Open\Command]
  @="C:\\Windows\\SysWOW64\\mshta.exe \"%1\" %*"
[HKEY_CLASSES_ROOT\htafile\Shell\runas]
  "HasLUAShield"=""
[HKEY_CLASSES_ROOT\htafile\Shell\runas\command]
  @="\"%1\" %*"
  "IsolatedCommand"="\"%1\" %*"
[HKEY_CLASSES_ROOT\htafile\Shell\runasuser]
  @="@shell32.dll,-50944"
  "Extended"=""
  "SuppressionPolicyEx"="{F211AA05-D4DF-4370-A2A0-9F19C09756A7}"
[HKEY_CLASSES_ROOT\htafile\Shell\runasuser\command]
  "DelegateExecute"="{ea72d00e-4960-42fa-ba92-7792a7944c1d}"
4. Save the file.
5. Double-click the .reg file to merge the new settings into the registry. For more information on how to work with .reg files, see Adding Registry Subkeys or Adding and Changing Registry Values.
6. To test, right-click an HTA file while holding down the SHIFT key. This will show the expanded context menu. Reboot not required. The menu should now contain the Run as different user and Run as administrator options, as follows:
The above procedure applies to Windows 7 and Windows 8. It may or may not apply to other operating systems. The procedure for Windows XP is similar to the above for the most part, but differs where all of the runasuser registry settings should be omitted from being added.